Author Archives: Keith Whitby

API Throttling

To promote a healthy environment, we implement API throttling. Your app’s requests will be subject to the following rules.

On this page

How repeat requests are handled

  1. Our API throttling is based on tokens. A single token can make no more than 60 requests per minute.
  2. The GraphQL API supports batch queries, but be aware that the request may be rejected based on the complexity (any request that could affect the performance of the server could be rejected).
  3. Every request will be replied to with request counters (remaining count, time for count reset) via HTTP response headers.

We suggest the use of local caches (on backend or frontend) for objects that you use frequently.

Got questions?

We are here to help. Ask us a question and we’ll do our best to answer as soon as possible.

Contact Us

Optix and GraphQL

GraphQL is a query language and runtime that helps us fulfill the exact information requested by external apps. It allows you to describe what information you want into a JSON like format and we will reply with the exact set of data.

GraphQL for many developers can be a replacement for REST, but we believe it’s only a flexible approach for requesting data. Also, it allows us to include more information and details to our APIs without affecting your app. We can mark fields as deprecated to inform you about something that we are considering remove, and you also provide us information of what kind of field are you currently using, this can help us drive the evolution of the platform.

On this page

Benefits over REST

  • Fewer requests: GraphQL accepts batch requests so that you can ask for all information required with only one real HTTP request to our server, faster for you and more effective.
  • Clear relationships: You can follow relationships between objects, so it doesn’t matter if your query starts from the booking or check-in, you can follow the relationships and fetch the data regarding the location, resource and other internal objects without multiple round trips to the server.
  • Less useless data: Quite often, you will require only a small portion of the all data node requested. GraphQL requires you to inform which fields you will effectively use, reducing the useless data transferred between Optix and your Application.
  • Strong typing: GraphQL is strongly typed, so you will know what kind of data you will receive.
  • Auto Documentation: GraphQL provides introspection capabilities, so you can use useful tools to help your development, like autocomplete on query editors and also API explorers.
  • Less work: You can use class/code generators/libraries like “Apollo” to create a set of mapping classes in your language that will inform all the data structure in your IDE.

What GraphQL does not offer

  • Caching on network level: You cannot rely on HTTP caching since the URL of the endpoint is always the same unless you hash your cache key based on all request data. Make sure to use the proper caching strategy when using GraphQL endpoints.
  • The endpoint is not verbose: The endpoint is always the same, and the query can return anything that you want. So make sure to use the tools we provide when creating a new query.

Related information

  • https://www.howtographql.com/
  • https://www.graphql.org/
  • GraphQL Voyager: A tool used to present the full relationship and objects available on the Optix API. Use the menu option provided on the ‘Develop’ page in Optix to use this tool with your organization or user token.
  • GraphQL Playground: A tool used to create/prototype queries/mutations using our API. Use the menu option provided on the ‘Develop’ page in the Optix admin dashboard to use this tool with your organization or user token.

Got questions?

We are here to help. Ask us a question and we’ll do our best to answer as soon as possible.

Contact Us

Using the API

The Optix API is GraphQL based and designed to provide you with the best possible experience. To support the use of our API, we provide two useful tools: the GraphQL Voyager and the GraphQL Playground.

More information on GraphQL and why we chose it is available in the Optix and GraphQL section.

On this page

Authentication

Tokens are authentication keys and are always associated with an app. They are used to identify the caller and restrict the data available via API.

Tokens are made available in the following ways:

  1. On the ‘Develop → your app’ page in the Optix admin dashboard.
  2. Via a webhook, delivered when an app is installed by an admin.

Each kind of token provides a different schema:

  1. Organization token: Related to an organization, this token is intended for interactions NOT related to a user. Any interaction will be logged against the app, and all information retrieved will be based on the organization associated with this token.
  2. Personal token: Related to a user, this token is intended for interactions on behalf of a user. Any interaction will be logged against the user, and all information retrieved will be based on the user/member/organization associated with this token.

Note

All tokens will expire from time to time. You should subscribe to the webhook “organization_token_updated” and update the token when you receive that webhook. You can find details on what to expect in the webhook here.

We support the Bearer authentication scheme, so you can do one of the following:

  1. Include the header Authorization: Bearer TOKEN.
  2. Add URI query parameter access_token=TOKEN.
  3. Set body parameter access_token. This only works for POST requests with either application/x-www-form-urlencoded, or application/json Content-Type.

Note: Make sure to access the Optix GraphQL API using a valid access token, otherwise you will not see the full schema.

Tip

Organization tokens always end with an ‘o,’ while personal tokens always end with a ‘p.’

GraphQL Voyager Tool

This tool provides a map of all objects available to you. You can navigate and read the documentation for each field, and also visualize the connections between objects.

Launch Voyager tool

You can also access the Voyager through the link provided in the ‘Develop’ page of the Optix admin dashboard, using the organization or personal token menu item:

The menus in the admin dashboard in ‘Apps –> Develop –> your app’ where you’ll find links to launch the Voyager tool with your tokens pre-filled.

GraphQL Playground

This provides a debug tool and documentation during the creation of a GraphQL query. Feel free to explore all the objects and test out all the parameters available. Click ‘Docs’ on the right to pull out a section where you can find information to help understand each object. This demo allows you to read (‘Query’) data, but writing (via ‘Mutations’) is blocked.

Important

This tool provides different results depending on the token provided. It reads from our current public APIs (using GraphQL introspection) and provides the most up to date documentation possible.

Example

This example is a query that fetches the name and email of the currently logged in user. Click the play button to run it. You could try adding a new line after email and adding user_id to get a feel for how it works. You can also open this example in another tab if you like.

Hidden on mobile

This tool doesn’t fit on screens this small. Please use a browser which is a bit bigger (you could try rotating your phone).

In the above example playground, mutations (writing to the API) are disabled.

You can also access the playground through the link provided in the ‘Develop’ page of the Optix admin dashboard, using the organization or personal token menu item:

The menus in the admin dashboard in ‘Apps –> Develop –> your app’ where you’ll find links to launch the Playground tool with your tokens pre-filled.

Got questions?

We are here to help. Ask us a question and we’ll do our best to answer as soon as possible.

Contact Us

Building Your First App

This page contains a step-by-step guide to get started.

It’s worth reading the overview page before jumping right into creating an app.

On this page

Getting started

Step 1

Log in into your Optix admin dashboard (yoursubdomain.optixapp.com). If you don’t have an Optix organization, contact us.

Step 2

Look for the item Apps → Develop, on the left-hand menu. If you are not able to see this link, get in touch with our support team to enable the option.

‘Develop’ menu item on the Optix admin dashboard

Step 3

Click the Create App button.

All apps for Optix must include a reference, which is created in an Optix organization. The app reference serves as the basis for the app details, the authentication tokens you can use to develop, and the app settings where you subscribe to webhooks and specify canvases for your UI.

Step 4

A window will open. Enter the app name and click the Create button.

‘Create app’ modal on the Optix admin dashboard

Step 5

A new app has been created and installed. A page will display details related to your new app.

The details in the section at the top (i.e., ‘category’ and ‘link’) are only required if you want to share your app with other organizations. If you do want to make your app public, please get in touch with our team.

The same page will present you some keys and tokens, as shown in the sample below:

Your app’s keys and tokens.

The Client ID never changes. It will be used to identify your app in the Optix system. The Secret is used to create signatures on webhook requests. The Organization and Personal tokens are generated automatically for your organization and currently logged in user.

Important

You will never be able to see tokens related to other venues in your dashboard. In the case where an app is public and is installed by an admin of another organization, Optix generates a new organization token, then submits this new token via a webhook (only if your app has registered to the “app_install” webhook).

Personal tokens can change at any moment, so you should never store them in your app. They will be shared with your app via URL parameters each time a canvas is displayed. Learn more about this in the Contextual parameters section

The menu located next to the token allows you to access the GraphQL Voyager, GraphQL Playground, and Webhook debugger. You can also copy and regenerate some tokens.

Overflow menu containing links to launch useful tools pre-filled with your tokens

The advanced settings file can be used to register the webhooks and canvases of interest by your app. Check the section Settings file to understand the file format.

Settings file section

Step 6

Create your app’s code either from scratch using the technologies of your choice, or using the boilerplate detailed below.

App boilerplate

Building an app for the first time can be time-consuming. A boilerplate could speed up your first few steps. We provide a PHP Laravel boilerplate, you will find it in this repository.

The README.md contains instructions on how to start the project and set up the configuration on the app configuration page.

Got questions?

We are here to help. Ask us a question and we’ll do our best to answer as soon as possible.

Contact Us

Using Optix

All of the documentation you will find on this website is designed to help with creating an app for Optix.

It is common that during the creation of your app, you would want to use Optix like any other user to carry out routine operations (e.g., adding users, making bookings, etc.)

For general support on using Optix, visit the Optix support site.

Got questions?

We are here to help. Ask us a question and we’ll do our best to answer as soon as possible.

Contact Us

App Example

Mobile users and admins can interact directly with apps using canvases. Alternatively, apps can be set up to leverage webhooks and other data from the Optix API without introducing new UI to the mobile app or admin dashboard. Apps can actively retrieve information from the Optix platform querying or mutating data via an Optix Platform GraphQL endpoint.

Each app can use different features and resources. The following is an example of how we can think about building an app that uses all three of the available technologies: webhooks, the API, and canvases.

On this page

Example app: Door access control

To describe the features of the ecosystem, we will use an example of an integration with an existing door access control system.

This hypothetical app’s primary purpose is to connect a third party system that electronically controls door locks. This app will allow a coworking space’s members to get into a room they booked using the Optix mobile app. This app will also notify the admin when any bookings are scheduled outside of the opening hours.

The requirements for this app are:

RequirementsSolution

As an admin, I receive an email if a booking’s start or end time occurs outside of the venue opening hours

When the user creates a new booking, a webhook is triggered that targets an endpoint in the app. This endpoint verifies the new booking by making a call to the Optix API bookings object. If the start or end time is outside of the opening hours, the app will send an email to the venue admin.

As an Optix mobile app user, I can click a button on the home screen, which opens a full-screen experience to allow me to unlock doors that I have permission to unlock

The app will include an HTML user interface that lists available locks, including an ‘unlock’ button.

To display this interface inside the iOS/Android mobile app, it will specify in the app settings that it wants a canvas to appear on the home screen, using the MOBILE_HOME_PRIMARY canvas.

When loaded in the Optix user app, the URL specified has the User’s token appended to it. You can write Javascript code to retrieve all the data related to that user’s bookings, via the public API.

This data empowers the app to display only the locks that the user has permission to unlock, i.e., locks for doors that are linked to the room they just booked.

Design

Below is a mockup of how the app could look. You can see the button that launches the canvas from the mobile app home screen, then the canvas containing the app’s UI on the right

Got questions?

We are here to help. Ask us a question and we’ll do our best to answer as soon as possible.

Contact Us

UI Kit

To simplify and streamline the interface creation process, Optix provides a full UI component kit that you can use to create your UI layouts. The UI kit contains all of the HTML and CSS, so all you have to do is specify which component you’d like to use.

On this page

UI kit overview

The UI displayed in canvases is expected to be simple; it should render quickly and look similar to the overall layout/style of the Optix platform. For this reason, it makes sense to provide a UI kit that simplifies the development and also stays up to date with the Optix UI guidelines (including fonts, colors, and field/button styles).

Just a few examples of the available components:

  1. Input (active state)
  2. Dropdown menu
  3. Buttons

Some interfaces, like “App settings” and “Admin main menu” can open in large canvases but are still surrounded by the Optix layout.

An example of a main menu canvas open on the admin dashboard.

  1. Optix admin dashboard (with a ‘main menu’ canvas selected)
  2. Canvas (where your UI displays)

We provide a simple HTML boilerplate of a canvas at https://api.optixapp.com/ui-kit/. The boilerplate provided includes two UI kit main files, the CSS and the JS. The UI kit is built using Vue.JS, and you could find more resources at https://vuejs.org/.

Libraries

Optix UI kit embeds some basic libraries, like Vuetify.js and Axios, so you don’t need to import any external libraries for basic actions. Please check the components available at https://vuetifyjs.com/en/components/api-explorer and the Ajax library methods for Axios at https://github.com/axios/axios.

You can use any Vuetify element in your app, check the example below:

Along with the Vuetify elements (prefixed by “v-”), we provide a few “optix-” components:

TagNotes
<optix-app>

This element adds the proper padding and context to other components of the page. It also provides a contextual class on the tag, related to the platform type:

  • is-android
  • is-ios
  • is-web
  • <optix-container>
    This element handle margins for inner elements.
    <optix-sheet>
    This element generates a sheet box that is useful for “app-settings” container.

    Axios is available at `this.$axios` object on Vue JS context. Also, the `this.$optix` provides a set of methods that are helpful for your development:

    TagNotes
    this.$optix.init(options)

    You may notice the “init” method in the HTML boilerplate. This method is important to activate the Optix component. It will read the context variables and also show the page only when the canvas is fully loaded (make sure to use the class “optix-show-on-load” at the main object)

    mounted(){
       this.$optix.init().then(()=>{
         this.message =
           ’Hello World! Loaded at ’+new Date()
          });
        }
    

    The options parameter is optional and can receive an object that overrides the current environment variables:

    client_id

    The app client ID (useful if your app open or link other canvases of your app). Default: null.

    access_token_argument

    The token argument name. Default: “token”

    this.$optix.graphQL(query, variables)
    You can call the Optix API using the method graphQL. All requests using this method will have the token from the canvas URL attached.
    
    this.$optix
      .graphQL(
        `query me { 
        me {
             authType 
             user {
               email
             }
           } 
        }`
      )
      .then(result => {
        console.log(result.data);
      });
    
    “Variables” is an optional parameter that corresponds to the graphQL variables that you specified in your query.
    this.$optix.openModal(id, context)

    You can open a modal canvas using this method. Use the identifier parameter to define the canvas target. The context variables will be concatenated as URL parameters.

    Make sure to provide a client ID at the init phase before using modals.

    mounted(){
       this.$optix.init({
       	       client_id:"your_app_client_id"
       	    }).then(()=>{
       	    // …
        });
    }
    

    The Optix App PHP boilerplate contains examples.

    Tips

    • Canvases are designed to load fast, so avoid embedding a lot of external resources.
    • Avoid compiling UI kit with your app (using webpack or any other package manager). They are cached at the browser side, and this cache is shared between all canvases when loaded from our servers. Usually, the unique file to be downloaded from the servers when your app canvas is shown is your HTML app.
    • Canvas resources are usually cached on the client, and the only way to clean the cache is by setting a short expiration time HTTP header on your server or changing the name of the file.
    • Keep it simple; don’t create external .JS files if you are not planning to reuse those files. 5K of JS script embedded on an HTML could be more efficient than 2K external files on some restrictive networks.
    • Feel free to use arrow functions or anything else from ES2015 (ES6). We do not support IE 11.

    Got questions?

    We are here to help. Ask us a question and we’ll do our best to answer as soon as possible.

    Contact Us

    Building interfaces for your app

    Optix enables custom user interfaces to be built and displayed in iframes or web views, placed within the Optix core products. We call these iframes ‘Canvases.’

    On this page

    Canvas overview

    A Canvas is an area for you to deliver consistent and contextual experiences to users. Canvases display your externally hosted UI inside the Optix admin dashboard or Optix mobile apps. To help with this:

    1. We provide a UI kit that you can use to easily create UI that follows the Optix UI guidelines.
    2. All canvases load with an authentication token parameter and other useful parameters (e.g., user ID) added to the URL. These enable the app to identify the organization/user via the public API securely.
    3. There is a list of the available canvases for the admin dashboard and mobile app. You can find more information on the using canvases page.

    An example of one of the canvases available for the mobile app. The native iOS/Android apps will load your canvas based on your app’s settings file.

    An example of one of the canvases available for the admin dashboard

    How canvases work

    You can specify which canvas you would like to use and the URL you’d like to show. The Optix admin dashboard and Optix mobile app will display a canvas in the area you have chosen. You can use this area to create content-rich and contextual experiences. The context comes from the additional parameters added to the URL you specified, where Optix includes the user’s authentication token and other relevant information like the user ID, booking ID, etc.

    Available canvases

    The below demonstrates the available canvases for the Optix mobile app. For a more detailed explanation of how to use canvases in your app, check out the technical specifications.

    Mobile app

    Admin dashboard

    Got questions?

    We are here to help. Ask us a question and we’ll do our best to answer as soon as possible.

    Contact Us

    Key Terms

    The Optix documentation contains deliberately named objects and references. The following terms will help you to understand what each term means.

    Location

    A building with a physical address. Locations contain resources like meeting rooms and desks. Several locations can be grouped in an ‘Organization.’

    Organization

    One or more locations, grouped with the admins and users, operating as a single flexible workspace entity. An organization is a customer of Optix; most customers have one organization, whereas some have several linked by a ‘Network.’

    Network

    Two or more organizations linked together. A network allows users to access the locations across multiple Organizations while maintaining administrative and financial separation.

    Admin

    An administrator responsible for managing an organization. They may have access to some, all, or just one of the locations. They are sometimes referred to as a ‘Venue manager.’

    Optix platform

    The Optix platform comprises the Optix admin dashboard, Optix mobile app, and the apps built by third parties.

    Optix admin dashboard

    The web-based product developed for organization admins. It is accessed via the organization’s subdomain (e.g., yourorganization.optixapp.com) and contains the tools required to manage a flexible office. It is also where you will find the ‘Develop’ page to begin building your app.
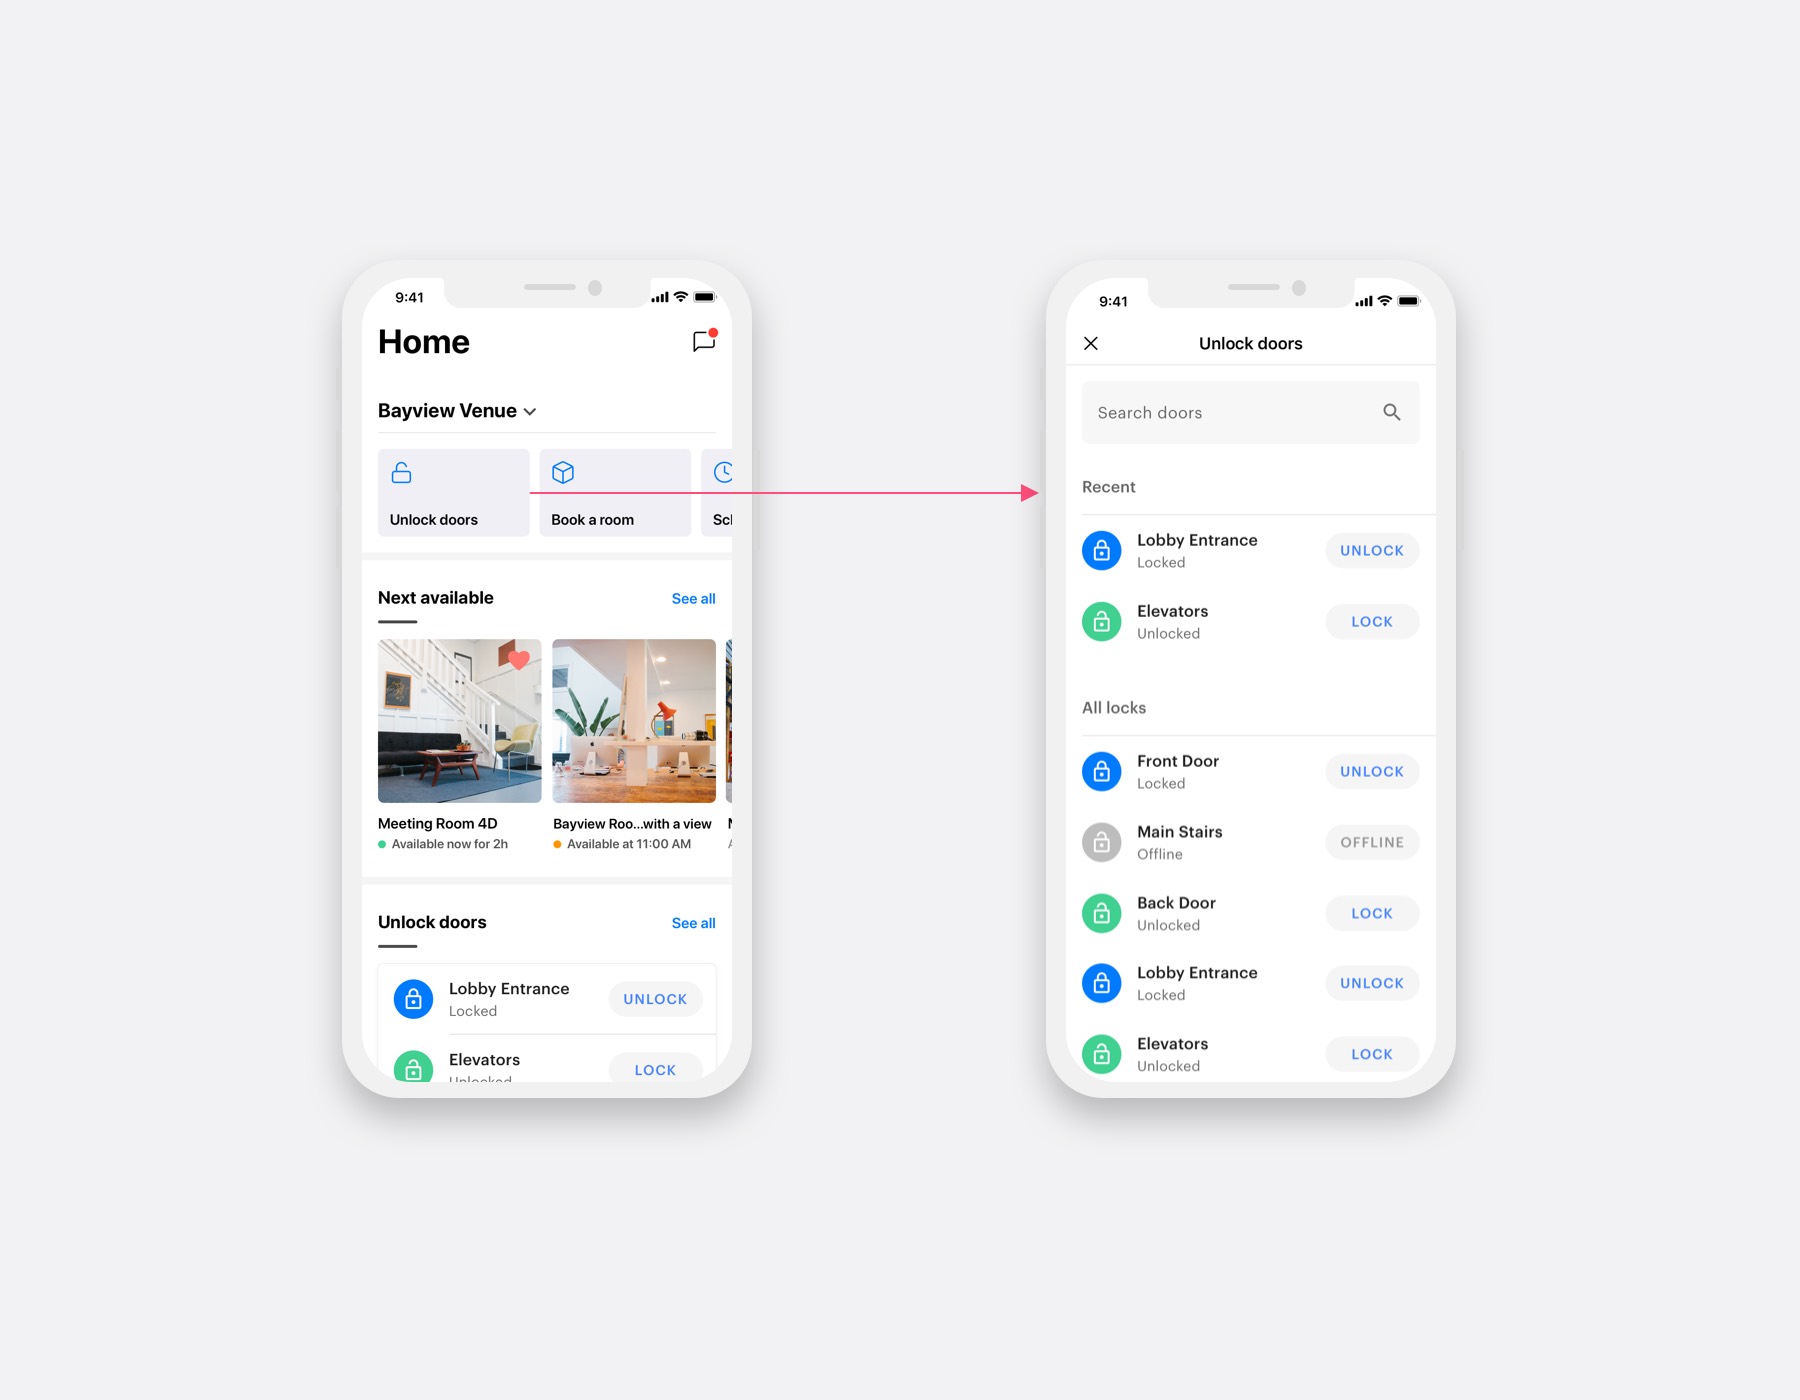
    Optix mobile app

    The iOS/Android mobile app created by Optix that provides a native experience to the mobile user. Optix releases the mobile app to the Apple App Store and Google Play store branded as ‘Optix.’ Some organizations opt to have a version created and released to the app stores, which includes white-labeled branding and their choice of app name.
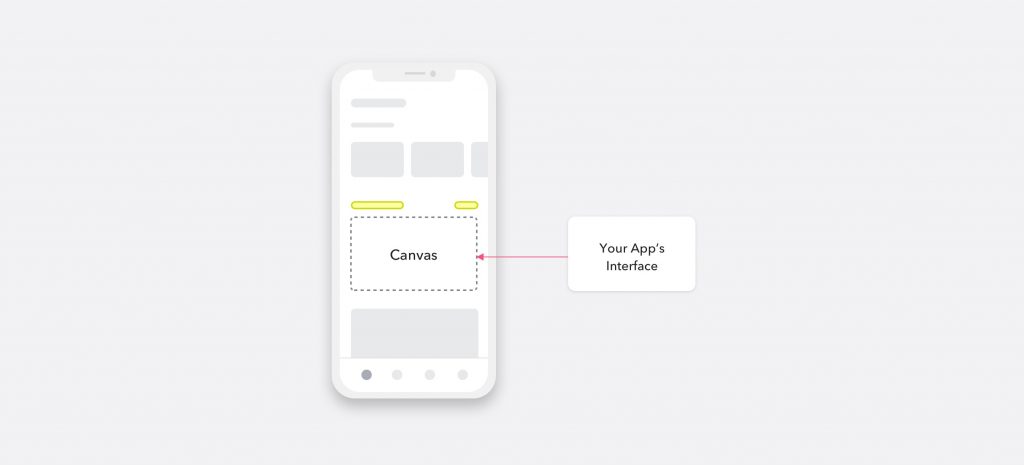
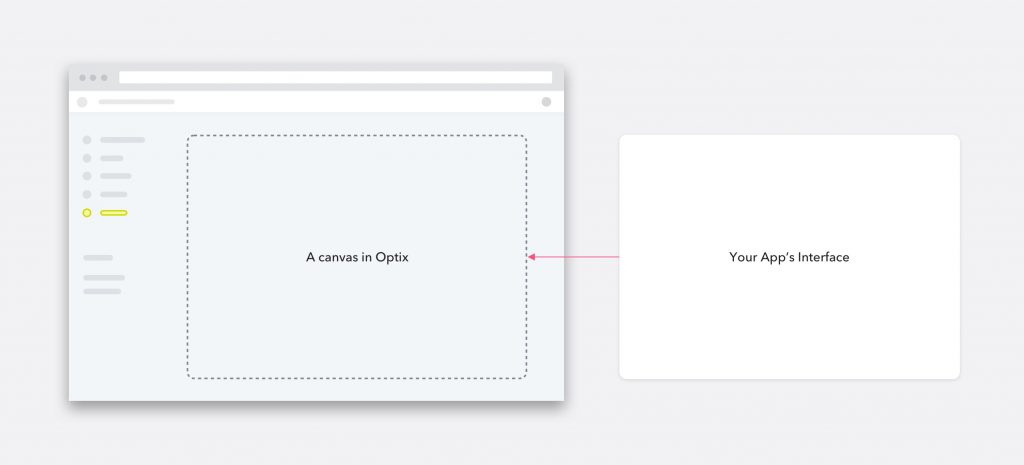
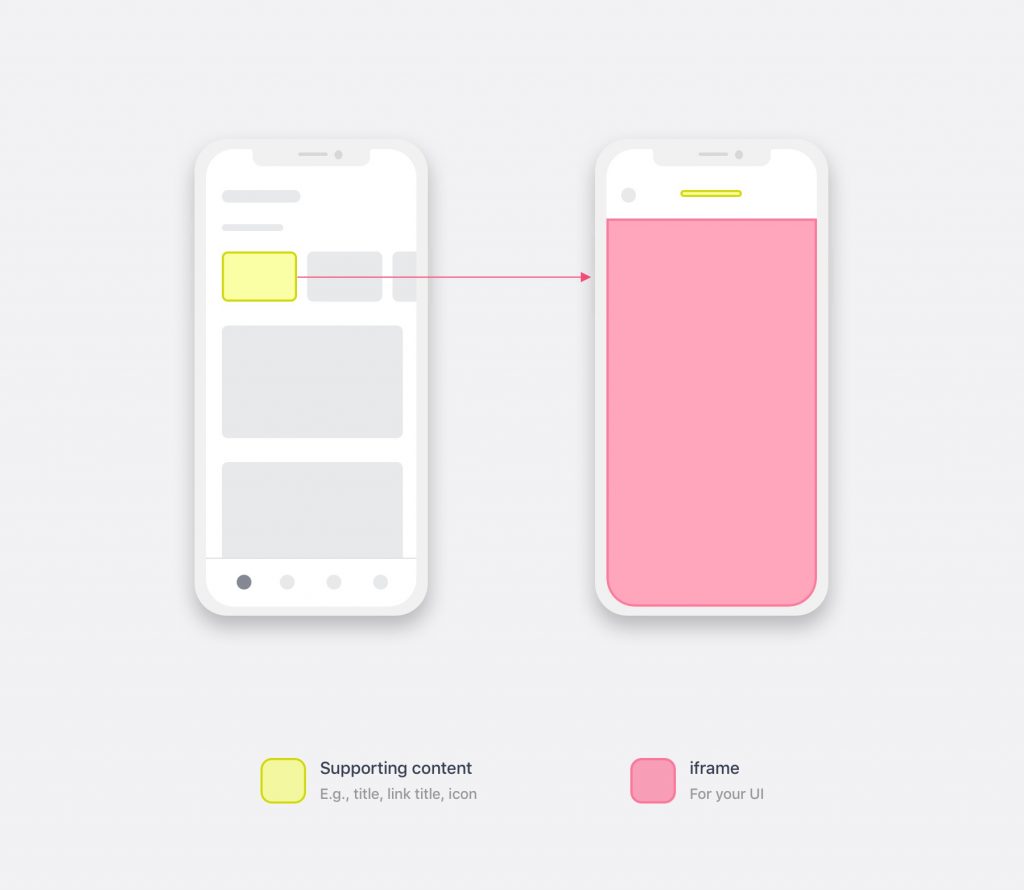
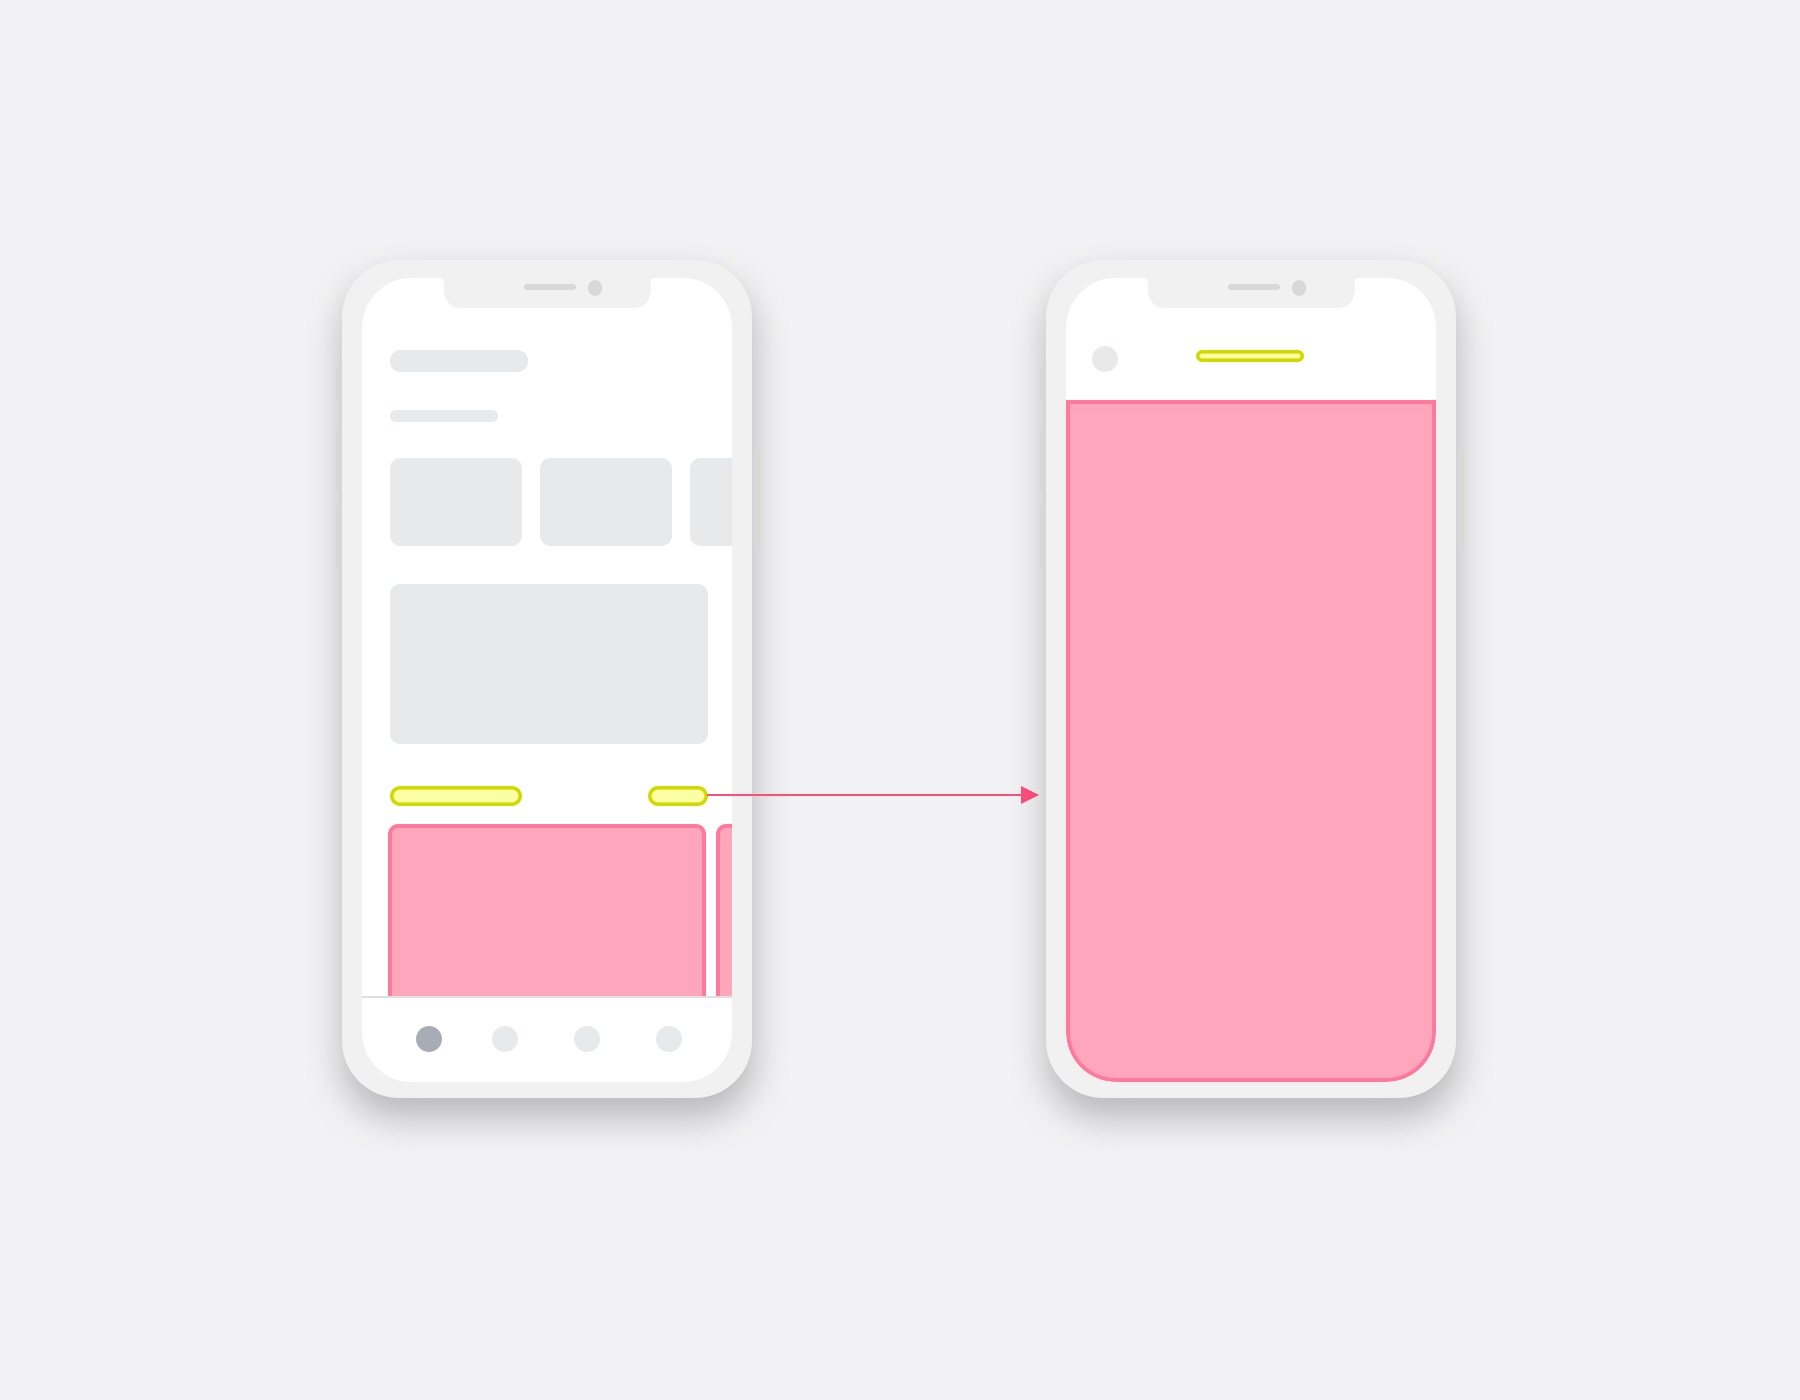
    App

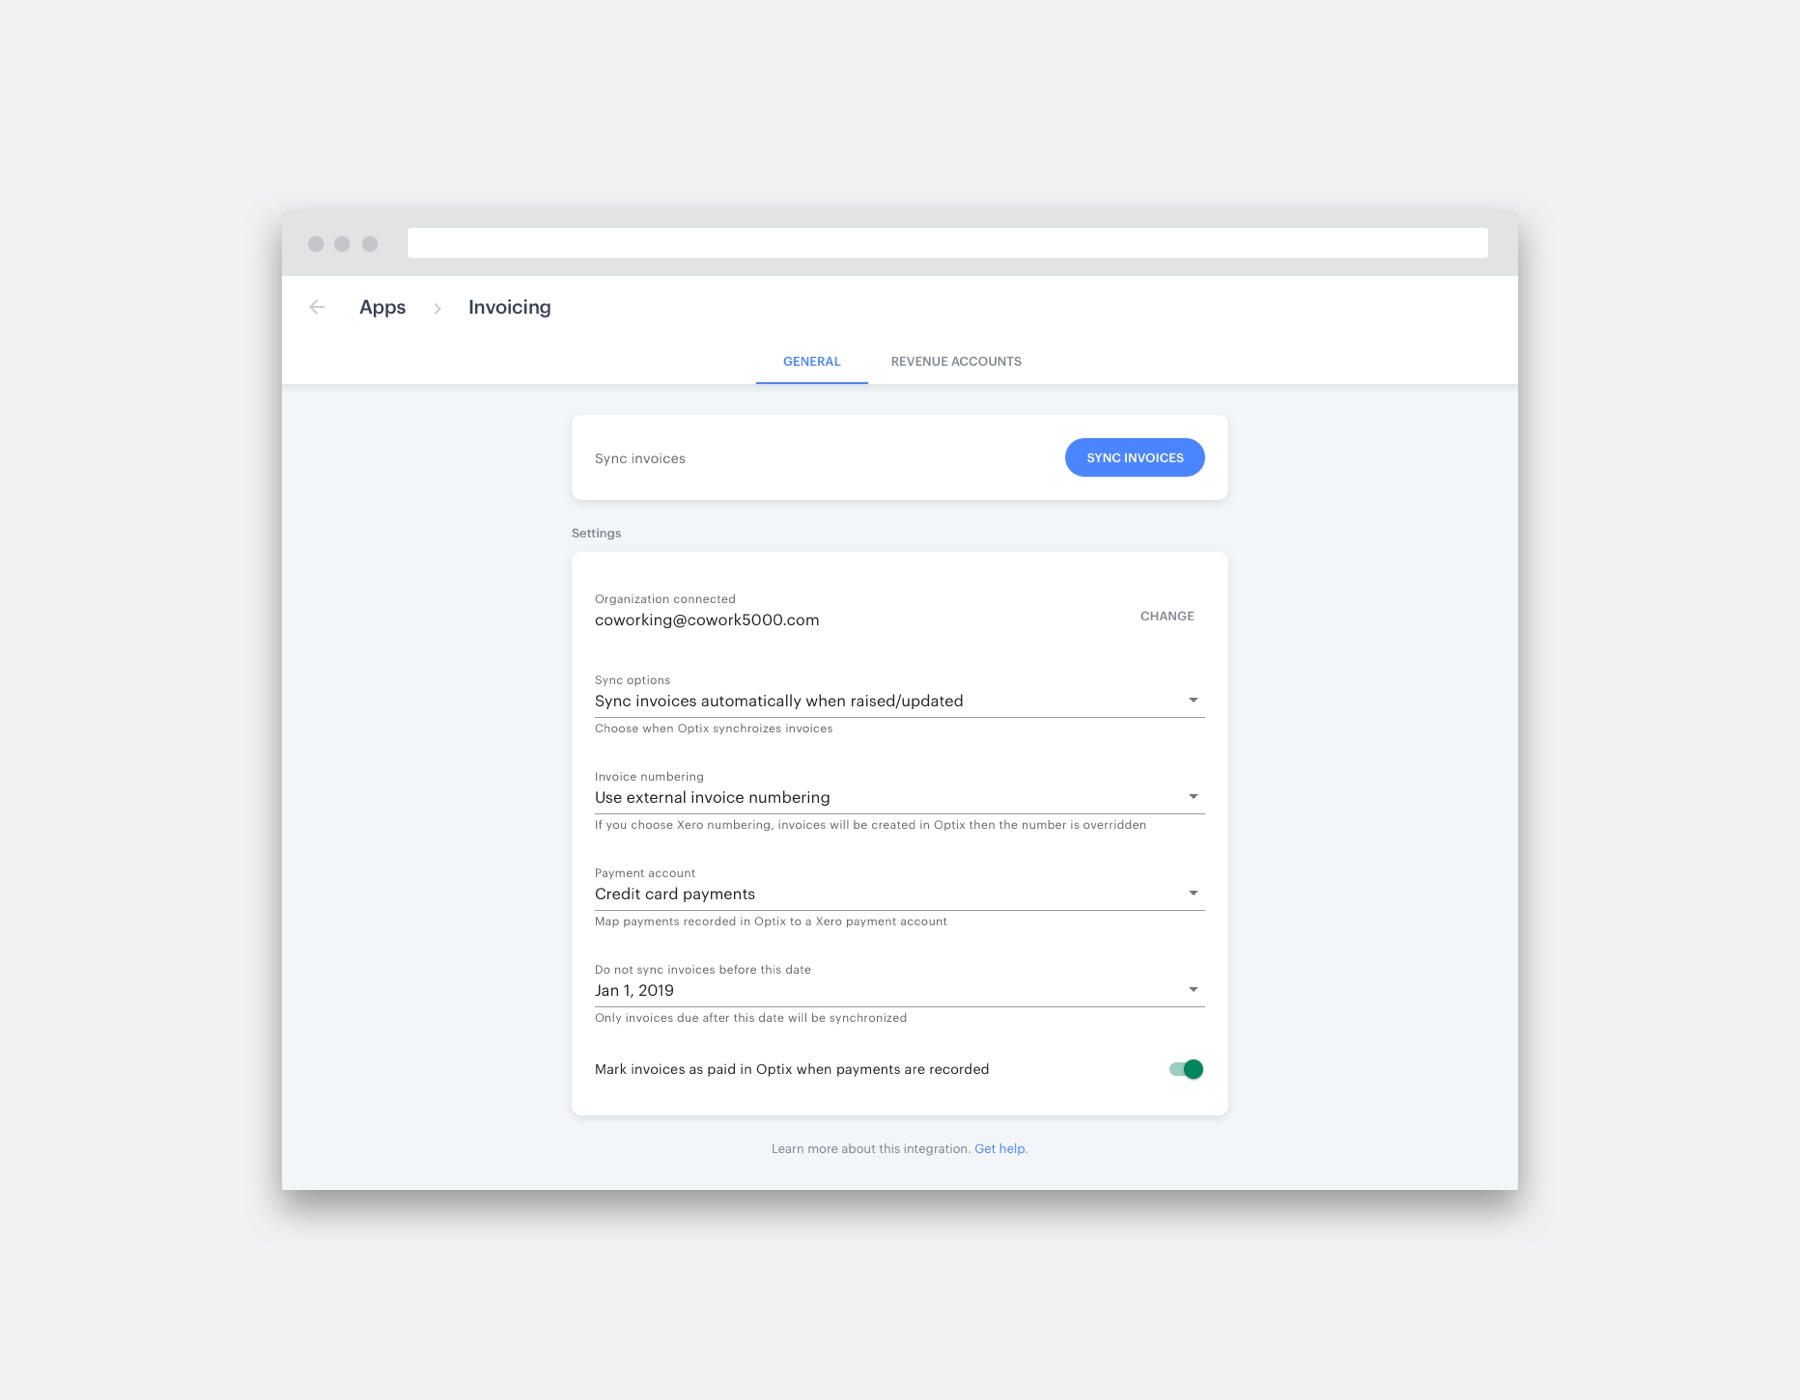
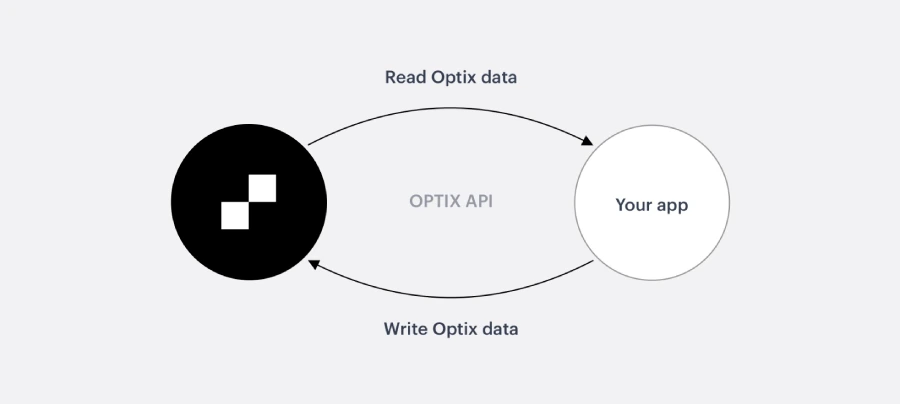
    An application developed by an independent developer/company, that interacts with the Optix platform via one or all of the following: the public API, Webhooks, Canvases.

    Mobile user

    A person that interacts with the Optix iOS/Android mobile app. These are often referred to as a ‘coworking space member,’ or simply ‘member.’

    Third party system

    An existing independent application built by an independent developer, that does not require Optix to run but can connect for automation and to enhance the user experience.

    Developer

    Any Optix client or independent developer/company that wishes to build an app that adds functionality to the Optix platform or to integrate a third party system.

    Got questions?

    We are here to help. Ask us a question and we’ll do our best to answer as soon as possible.

    Contact Us

    Optix platform overview

    The Optix developer platform enables you to create apps that transform the workplace and solve real-world problems. Once built, apps are installed in an Optix organization by an admin. They add functionality for the admins, the mobile app users, or both.

    The development ecosystem provides three different components that can be used to build an app for Optix: the public API, webhooks, and canvases. Some apps will require only one or two, while others will use all three.

    Important

    To interact with the Optix development ecosystem, you will need an Optix Organization to log in to. You will find this at your subdomain, e.g., yourorganization.optixapp.com. If you do not have an Optix Organization, you can contact us and we’ll help you get set up.

    On this page

    Public API

    The purpose of the public API is to enable dynamic interactions by third-party apps that can retrieve or change information related to an organization or user.

    To start using it, go to Using the API. If you’d like to jump straight into experimenting with the API, try out the API playground.

    You can use the API to read data like users, bookings, invoices, etc. We are increasing the number of objects available, including new mutations (write) operations. For a visualization of the available objects and their fields, check out the API explorer.

    Webhooks

    Webhooks notify apps about changes or activities that take place in Optix, for the specific actions that the app subscribes to.

    It is preferable to subscribe to webhooks to listen for changes, rather than polling the API to look for changes.

    To learn more, go to the Using webhooks page.

    Canvases

    Canvases are iframes that display within the user interface of the Optix admin dashboard, and web views that display in the mobile app. They can be used to display information to users, present forms and buttons for interaction, or any other element that can be built using HTML. Canvases include information like the user’s token and other relevant data. The page you design can react to these properties, offering relevant and contextual experiences.

    More information is available in the Canvas overview and Using canvases sections.

    Canvas example

    You have several options when choosing where the canvas will be displayed. The below is an abstract illustration that shows an example of the Optix admin dashboard displaying a ‘main menu canvas’ and the Optix mobile app displaying a ‘home screen section’ canvas.

    1. Optix admin dashboard
    2. Optix mobile app
    3. Title/icon for your web canvas
    4. Canvas in admin dashboard for your UI
    5. Title & additional link for your mobile canvas
    6. Canvas in mobile app for your UI

    Installing apps

    For an app to interact with an Optix organization, it must be installed in the ‘Find apps’ page of the Optix admin dashboard. The installation process adds the app into the ‘Manage apps’ page and triggers a webhook (called “app_install”) which contains the authentication token for the organization.

    When thinking about creating an app for Optix, you should consider your audience. There are two distinct scenarios you should consider for your app:

    1. You are developing an app only for your Optix organization: Your app doesn’t care about the venue configuration, you know all the rooms, IDs, doors, devices, etc. The app is not available in the ‘find apps’ page for any organization other than your own.
    2. You are developing an app for any Optix organization: Your app will be available in the ‘find apps’ page for all Optix organizations (after approval from the Optix team) and will be able to be used by any Optix organization that installs it. You will enable Organization-specific configuration and data storage.

    App infrastructure

    Your app could be developed using any programming language or technology and will be hosted by you, on any infrastructure. If you like, you could choose to use the boilerplate app that we provide.

    Got questions?

    We are here to help. Ask us a question and we’ll do our best to answer as soon as possible.

    Contact Us